By: Katie Shore Jul 11/2019
So you’ve gone through all the steps of creating an excellent digital marketing campaign. You know who your audience is and why they’re the ones who will help you reach your business’ goals. Your team has created beautiful ads with creative, insightful copy. The platforms you’re using are perfect for reaching your ideal customer. The campaign is ready to launch and you’re excited to see the results.
But how will you know exactly what’s working within your campaign? Google Analytics allows you to gather data from all of the traffic that comes to your site, but some extra work needs to be done so you can analyze your data based on how the users are finding your site.
Enter the UTM tag, an essential component to tracking and developing your digital marketing campaigns.
UTM stands for “Urchin Tracking Module”. Urchin was an analytics software that was sold to Google and eventually developed into the tool that all digital marketers know and love: Google Analytics.
A UTM tag, or UTM parameter, is a snippet of text within your URL that acts as a tracking tag. When a URL with a UTM parameter implemented is clicked, Google Analytics will be able to easily gather more information about where the user is coming from and what exactly they clicked to get to your website.
For example, with UTM parameters in place, you would be able to see that your email campaign is driving the highest amount of conversions, or that one of your Facebook ads has a higher click-through-rate than the others you are running. These insights wouldn’t be available to you if you didn’t have these tracking codes enabled. When you are more easily able to see which ads and channels are leading to certain behaviours, you are then able to optimize your campaign because you know what specific things are working.
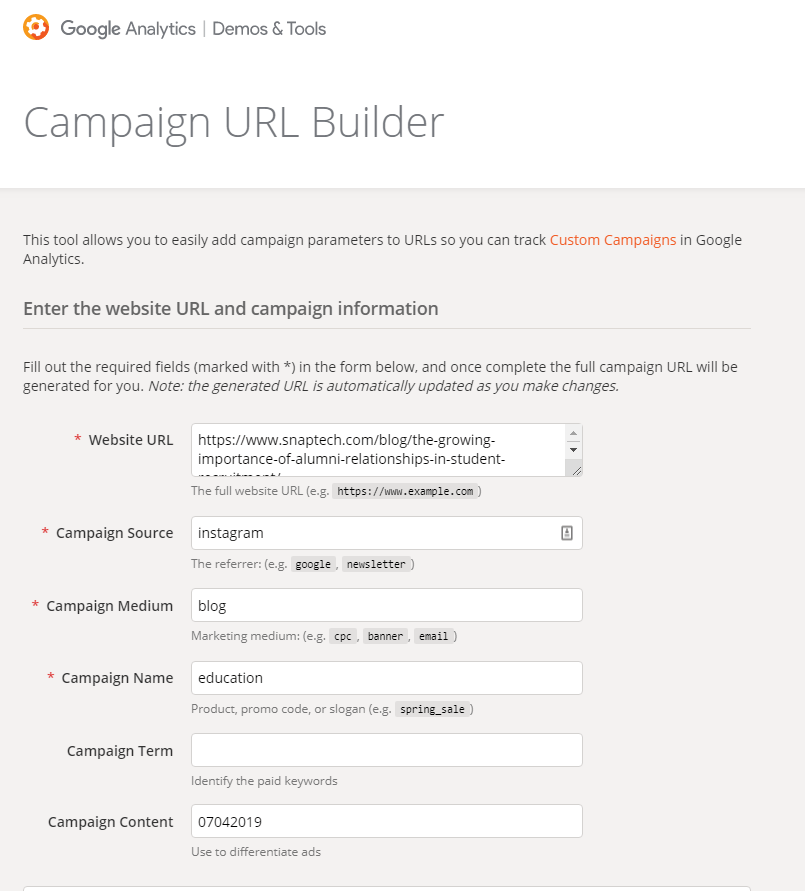
There are five different components that can be added to a UTM tag. You can see them in the screenshot below, which is taken from one of our favourite UTM building tools – The Google Analytics Campaign URL Builder. We track all of our campaigns using Google Analytics, so we love how this one optimizes them for analytics use.

In the first box, you’ll see the original URL that was used to create the tag. This is the link that you want users to visit when they click on your social post, paid ad, or email.
Campaign Source:
You can think of the source as the website or app that the user has accessed in order to get to your site. This is useful in comparing the performance of different platforms within your analytics.
Campaign Medium:
This tells you exactly what the user has clicked on. In the example above, the “blog” medium signifies that the user clicked on one of our blog posts.
Campaign Name:
If you have a few different campaigns that you are running at once, naming the campaigns can help you compare the performance of different offers or campaigns to see what is performing the best.
Campaign Term:
If you’re targeting a particular keyword, this is where you’ll implement it into your UTM tag so you can track that keyword’s performance. This is especially effective within paid search campaigns.
Campaign Content:
You can use this to differentiate between different ads. In our case, we put the date into our UTM tag. We have a lot of different blog posts that lead users to our website through the same sources and mediums; the date helps us to determine which blog posts are performing the best on which channels.
We recommend inputting, at very least, the source and medium into every UTM tag that you create. The best practice is to fill out each component using lowercase only – this eliminates the possibility of Google becoming confused by capital letters and potentially diluting your data.
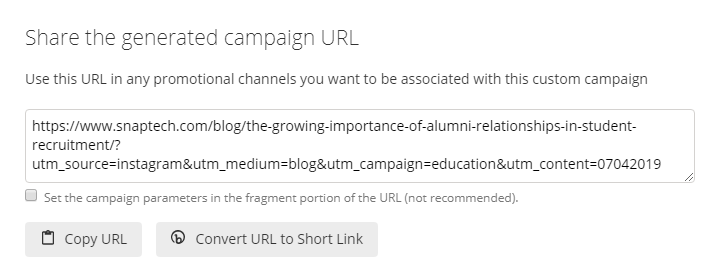
Congratulations, you’ve created your first UTM tag. You’re well on your way to having a track-able campaign! Once your tag is generated, your URL will look like this:

You can see within this URL that each component of the tracking code has been added into the URL; for example, the campaign source has been implemented as “utm_source=instagram”.
With the UTM parameter added, this has become quite a long link. If you’re adding this link into a button on an email or within a banner ad, this won’t be an issue, as the user won’t see the whole ad. However, within social media, a long URL like this can appear like spam; it might not even fit in a tweet! This is why we recommend converting the URL to a short bit.ly link so that it appears to the customer as it does at the end of this LinkedIn post:

This shortened link looks more professional to users than a long tag does. It is worth mentioning, however, that the entire tag will appear in their browser, so make sure that tags are written in a way that is appropriate for your customers to see.
We also recommend keeping track of your URLs with the UTMs added within an accessible, clearly-labelled spreadsheet, so that everyone in your company can clearly see which links should be used on certain platforms.
Finally, it is important to note that UTM’s are case sensitive. This means that if you don’t use the exact same spelling and capitalization you’re going to end up tracking things differently. For example, Facebook and facebook will be categorized separately – so keep it consistent!
Getting into the habit of implementing UTM parameters for all URLs used within your digital marketing campaigns will allow you to compare the progress of different campaigns and sources, which will allow you to not only adjust your current campaign, but bring this information into future campaigns.
Setting up a digital marketing campaign, and analyzing the data collected, is no easy process. Contact Snaptech today – creating data-driven marketing campaigns is what we love to do. We’d love to help you develop (and track) a digital marketing campaign that achieves your business goals while collecting data that helps you to learn valuable information about your customers.